Since we're all about updating the girls' bedroom,
First, I dumped them all out on the floor. I should have taken a picture because I was shocked. I knew there were a lot, but I couldn't believe that they all fit in that toy box. There were Cabbage Patch Dolls, stuffed animals, random talking dolls, doll clothes, doll diapers, doll diaper bags, a doll carrying car seat, doll bottles, etc. I found all of the mismatched items and pitched them. It felt good to get rid of the excess.
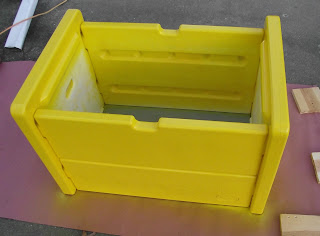
Then I took the toy box outside and started to paint. WAIT....I did my research and knew that regular spray paint wasn't going to work on the plastic toy box. I went to Walmart and purchased a can of Krylon's Fusion for Plastic. We wanted the toy box to match the theme of the room, so we decided to go with their Sunbeam yellow. Their pink just didn't match their regular Watermelon pink.
I cleaned the toy box and got to work. I wasn't sure what to expect, but it worked great. I didn't have any dripping problems, nothing ran, and the paint adhered perfectly to the toy box! Success. I applied about 3 coats and it covered the plastic great. I had to add a couple of extra coats to the Little Tykes logo, since it was dark red and blue.
While we (Lily and myself) were waiting for the toy box to dry. We worked on the lid. Ryan had the great idea of turning it into another bench! I had some batting and hot glued it to the lid of the toy box. Guess what? I love hot glue. I honestly can't think of anything that it doesn't work on! Trust me, I've used it on so many different surfaces!
I know there's tons of pictures, but it felt so good making this. It was in great shape, the storage was needed, but it needed to be redone.
Once we got the batting on, we added some of the peace sign material. The same as the bench makeover. Once the toy box was dried, Ryan carried it up to the room and we added the bench lid. I thought it looked great, Chloe liked it, and Lily claimed it as her new big girl bed!


How many cans of paint did you use? I'm thinking of doing this and it would be nice to know so I'm not having to make multiple trips to the store. :-) Thank you!
ReplyDeleteI ended up using 2 cans of paint! I suppose I could have added another coat and used 3, but 2 worked great.
ReplyDeleteHow much fabric did you use?
ReplyDeleteIt ended up being a little less than a yard. If you're choosing a light print fabric, you might want to put a white fabric underneath.
ReplyDeletedid you use some kind of protective coat over the yellow spray paint? i did this but it scratched off easy :(
ReplyDeleteNo I didn't add anything. The kids have this one in their bedroom so it isn't used as much as our downstairs toybox, so I haven't had any scratch off yet. I'm sorry to hear that happened.
ReplyDeletei ended up doing a top coat and it turned out awesome! thank you very much, you definitely inspired me. =]
ReplyDeleteThat looks AMAZING! I love the black and pink combo. I'm so glad that it worked out and the idea of a top coat is so smart. If our toy box ends up being used more or downstairs, I'll definitely put a top coat on. Thank you so much for sharing the picture!
ReplyDelete